DMCA PROTECTED AND MONITORED

© COPYRIGHT – ALL RIGHTS RESERVED. This site is protected and monitored by DMCA.COM - ANY UNAUTHORIZED Reproduction, Duplication, Distribution of any kind is STRICTLY PROHIBITED. All original content is created by the website owner, Barron Shepherd, including but not limited to text, design, code, images, photographs and videos are considered to be the Intellectual Property of the website owner, Barron Shepherd, whether copyrighted or not, and are protected by DMCA Protection Services using the Digital Millennium Copyright Act Title 17 Chapter 512 (c)(3). Direct linking, reproduction or re-publication of this content is prohibited without permission. Under 17 U.S.C section 101 et seq. those who violate the DMCA could be liable for statutory damages as high as 150,000.00 as set forth in section 504(c)(2) therein.

Showing posts with label Combat Judo. Show all posts

Tuesday, November 5, 2024

Barron Shepherd Judo: Tsuri Komi Goshi - Lifting Pulling Hip Throw

 Tsurikomi Goshi - Lifting and Pulling Hip Throw, is one of the original 40 throws of Judo as developed by Jigoro Kano. It belongs to the second group, Dai Nikyo, of the traditional throwing list, Gokyo, of Kodokan Judo. It is also part of the current 67 Throws of Kodokan Judo. Tsurikomi Goshi is classified as a hip throwing technique (Koshi-Waza).

Tsuri Komi Goshi - Arm Pit grip Variation

1.) Both players are fighting in a right vs right situation.  

2.) Blue punches a right armpit grip.   

3.) The opponent immediate grips Blue right sleeve reaches for a high collar or back grip with his left. As the opponent starts to reach for the high grip blue pulls with his left hand and brings his right arm under the opponents arm pit as he steps to the inside with his right foot to the inside of the opponent's right foot. The opponent misses his left high grip as blue is moving under it and to the inside. 

4.) Blue starts to pivot on his right foot as his left hand comes up under the opponent's armpit. 

5.) As Blue continues his pull with the left hand he pivots 180 degrees he bring his left foot in line with his right foot. 

6.) Blue straightens his legs popping his hips upward and pulls his left elbow to his left hip turning his upper body counter clockwise to finish the throw.

Saturday, August 19, 2023

Shoulder Throw vs Rear Hand Straight Punch


“THE STOP” can be found in the US Army combatives Field Manuals 21-150 from 1954 through to 1971. It can also be found in earlier works such as Willaim Jacomb’s 1918 book on Practical self defense where it is referred to as “THE STOP”. It is also used in the 1905 book, The Complete Kano Jiujitsu/Judo. Simple, gross motor driven direct and effective, it takes our natural survival instincts into consideration and allows those survival instincts to work as a foundation for a very rapidly delivered technique. Turning this instinctive reaction into a hit, thrown much like a straight punch in boxing as opposed to a push, you can stop the rotation of the attacker’s torso at his shoulder. This tactic is incorporated into my boxing skills and combinations. It can be utilized as a preemptive strike or when the attack is recognized early or late.

Preemptively, “THE STOP” is used just before the adversary is within striking distance and when your intention is to take him to the ground. When delivered it stops the forward motion of the attacker and brings his arms up toward the front(1st picture below).

When it is used to intercept a punch early, striking the pocket of the shoulder stops the rotation of the adversary’s torso at his shoulder (2nd picture above). “THE STOP” is also effective when you pick up on the attacker throwing a punch late. For example, if the attacker throws a right haymaker, step off line of the punch and at an angle to your right and deliver the strike with your left hand to the attacker’s right shoulder (3rd picture above). This tactic basically short-circuits the power of your attacker’s punch at the root of its motion.

“THE STOP” is not a push, it is a strike, delivered much like a straight punch in boxing either with the lead hand like a jab or the rear hand. Targets the area where the shoulder meets the chest and immediately follow up by grabbing the adversary’s shirt at the area struck. Once the adversary has been rocked backwards, immediately follow – up with a pull bringing up off his heels  and toward you for more strikes or a throw or take down.

Shoulder Throw vs Rear Hand Punch

1.) From a ready position, you see the aggressor start to throw a rear hand punch. Push off the left foot and step forward with your right foot at a slight angle along the right side of the triangle slipping to the inside of the punch. Simultaneously strike the aggressor’s shoulder right above the armpit jamming his attempted punch. Immediately grip his shirt at the area struck.

2.) Pull the aggressor toward you with the left hand rocking him forward up off his heels. At the same time that you start your pull with the left hand, your left foot moves up toward the top of the triangle.

3.) Then Immediately step your right foot to his right foot. The toes of your right foot should be almost touching the inside of his right foot, next to his big toe. Your right arm moves under the aggressor’s right armpit.

4.) Pivot counter clockwise on the ball of your right foot and continue to pull with the left hand. Your left foot steps back all the way through the triangle between the opponent’s feet. The toes of both feet should be pointing in the direction of the apex of the triangle. Pinch the opponent’s right arm at his arm pit between your right forearm and bicep. Rotate the palm of the right hand toward your head (this creates a tighter clamp on the opponent’s arm).

5.) Pull downward with your right hand as you straighten your legs quickly by driving upward off your heels, popping your hips upward into the opponent.

6.) To finish the throw, continue to pull and twist your torso by turning your right elbow toward your left knee and drive the opponent to the ground.


Tuesday, May 16, 2023

IPPON SEOI NAGE – Right vs. Right - Opponent reaches over top (Split Step entry)


Since it’s birth Judo has changed with the times. Even so, the essential nature of judo has remained the same. Judo is judo. Born out of innovation, the sport of Judo lends itself to specialization. Toshiko Koga perfected a variation of seio nage that required little in the way of gripping and got him consistently under his opponent’s hips. 
Koga’s powerhouse technique was the ippon-seoi-nage and he had an impressive range of seoi-nage variations. 

There were four distinct variations of seoi-nage that Koga did. One type of morote-seoi-nage he had used since the early days of his competition career was the cross-grip morote-seoi-nage. The morote-seoi-nage he is most known for is the legendary one-handed morote-seoi-nage that he did on Chang Su Li of North Korea in the semifinal of the 1989 world championships. 

In the 1989 World Championships, he did yet another unusual form of seoi-nage. It happened in the final, against a left hander, Mike Swain of the USA. Instead of inserting his lead leg like he usually does, against Swain, he did an extremely wide split seoi-nage. At the 1996 Atlanta Olympics Koga would use a two on one lapel grip, grabbing his opponent’s right lapel with both hands. 

Firstly, Koga’s entry was ballistic. It was so quick and so powerful that even if he didn’t hit it cleanly, he could often get the score anyway. Koga’s seio nage wasn’t the traditional seoi nage. There were two things he did that made it more effective; 1.) His split step entry, and 2.) his use of the lapel grip rather than the more conventional sleeve grip. There was absolutely no question what Koga was going to do in 99% of his matches. He was going to secure his left-hand lapel grip, break your posture, and launch you skyward with his seoi nage. His opposition knew what Koga was going to do and couldn’t do a damn thing to stop it.

1.) Step your right foot forward at the top of the triangle. Your knees should be bent and your center of gravity low. Twist your upper body clockwise bring your left hand and shoulder to the front closer to your opponent. In a right vs. right situation your right shoulder should be more toward your rear and not out front and easily accessible for your opponent to grip and attack. You left hand is your attacking hand and your right hand is the defensive hand. 2.) From a right foot forward posture, punch in your grip with the left hand gripping at the area of the opponent’s armpit. 3.) The opponent attempts to reach over the top of your left arm with his right hand to get a grip on your lapel. Roll your elbow upward and block his arm to keep his hand from grasping your lapel. As you block with the elbow bend the knees to drop your hips lower (this creates a space for you to move into to execute a throw).

4.) Pull your opponent toward his front with the left hand keeping your elbow high. Simultaneously, step your left foot up to your right foot about a half of a step forward. As you step keep your knees bent. Your belt line should be lower than your opponent’s belt line. 5.) Step your left foot to the top of the triangle. 6.) Your right foot steps back all the way through the triangle between the opponent’s feet pivot on your left foot. As your right foot touches the mat, you should be on the ball of your right foot and the toes of both feet should be pointing in the direction of the apex of the triangle. Pinch the opponent’s right arm at his arm pit between your right forearm and bicep. Rotate the palm of the right hand toward your head (this creates a tighter clamp on the opponent’s arm). 


 7
.)  Step back with your left foot thru the triangle between your opponent’s feet and next to your right foot (as you step back with the left foot  your opponent’s feet should start to raise up off the mat). 8.) Straighten your legs quickly and pop your hips upward into the opponent. 9.) Continue to pull and twist your torso to the left, taking your right elbow toward your left knee and drive the opponent to the ground. 

Wednesday, May 10, 2023

COMBAT JUDO: OSOTO GARI


Being able to utilize judo and its principles in a street encounter requires more attention to the technical aspects of throwing an aggressor not wearing a judo gi (uniform). I have in the past two years written three books addressing this very thing, two of which got great reviews and have sold out. My third book (pictured left) "Combat Judo" will be published 2024. 

Personally as a long time Judoka, I look at what I do with the sole perspective of; If this is the system I am fighting with, how am I going to do that and be effective in a realistic context? In my first book, REAL COMBAT JUDO, I worked off a very specific tactic called “THE STOP”. This tactic can be found in the US Army combatives Field Manuals 21-150 from 1954 through to 1971. It can also be found in earlier works such as Willaim Jacomb’s 1918 book on Practical self defense where it is referred to as “THE STOP”. It is also used in the 1905 book, The Complete Kano Jiujitsu/Judo.  The stop is a simple, gross motor driven direct and effective movement, it takes our natural survival instincts into consideration and allows those survival instincts to work as a foundation for a very rapidly delivered technique.

 “The Stop” capitalizes on the natural human reaction to extend your arms when someone attacks you by pushing him away.  Turning this instinctive reaction into a hit, thrown much like a straight punch in boxing as opposed to a push, you can stop the rotation of the attacker’s torso at his shoulder. “THE STOP” can be utilized as a preemptive strike or when the attack is recognized early or late. “THE STOP” can be used preemptively, just before the adversary is within striking distance and when your intention is to take him to the ground. When delivered it stops the forward motion of the attacker and brings his arms up toward the front (1st picture below).


The Stop can also be used to intercept a punch early, striking the pocket of the shoulder stops the rotation of the adversary’s torso at his shoulder (2nd picture above). It is also effective when you pick up on the attacker throwing a punch late. For example, if the attacker throws a right punch, step off line of the punch and at an angle to your right and deliver the strike with your left hand to the attacker’s right shoulder (3rd picture above). This tactic basically short-circuits the power of your attacker’s punch at the root of its motion. 

The Combat Judo one - two 
You can use "the stop" in combination with another strike to keep the opponent's balance and posture disrupted. Think of a boxer throwing a one - two combination.  
1.) Executed similar to a one - two combination in boxing, from a fighting stance or non violent posture, push off the rear foot and step forward with your left foot shuffling forward and strike the opponent at the pocket of the shoulder with a lead straight open hand strike (picture the movement of a boxer throwing a jab as he shuffles forward). The impact should rock the opponent back on his heels. The left hand immediately grabs the opponent's shirt at the area struck.  2.) Pull the opponent into you bringing him forward off his heels as you push of the rear foot again stepping toward 11 o'clock with your left foot shuffling forward.  As you pull the opponent into you deliver a hack with the outer boney area of your right forearm to the left side of the opponent's neck (picture this movement as that of a boxer throwing a rear hand straight punch). 

1.) From your fighting position your attacker attempts a right punch. Push off the left foot and step forward with your right foot off line and strike him hard in the pocket of his shoulder. The strike should stop his rotation and knock him back on his heels.  2.) Grab his shirt at the area struck and pull him into you as you push off your right foot and step with your left foot toward 11 o'clock. Simultaneously strike him with the blade of your right forearm in the throat or the side of the neck.  3.) Draw the right arm back and execute a horizontal elbow strike (when doubling up the hack with the horizontal elbow think of rechambering the hack more the like the action a pump shot gun. Rechamber then execute the elbow).  4.) Swing your right leg up between your opponent's right leg and your left leg. Sweep his right leg up  high with your right leg to finish the cross hock takedown/osoto gari/major outside reap. 

See related articles:
http://combatjudo.net/combat-judo-blog/boxing-the-sweet-science-unleashed/ http://combatjudo.net/combat-judo-blog/the-judo-arsenal-osoto-gari-for-practical-self-defense/

Wednesday, April 19, 2023

ONE HANDED JUDO: Gripping and Grip Fighting


Ippon Seoi Nage off Arm pit grip only.
       

There probably was not a greater judoka than the man who literally introduced to the world a one handed style of Judo, the legendary Toshiko Koga. Koga is regarded as having the greatest Ippon Seoi Nage ever.  He is the sole reason I fell in love with not only his one handed style but many variations of Seoi Nage. 

The one-handed style of judo is very effective and allows for great adaptability and the ability to execute like Ippon Seoi Nage from multiple angles and directions. Being able to throw with either foot forward and to the right and left side leaves your opponent questioning from which direction your will attack.

 Ippon Seoi Nage - Koga variation

In this style you get a grip with one hand while your free hand fights off the opponent’s attempts to get their grip. Most judoka look to get their grips with two hands this makes the seemingly minimal contact of just getting a grip with only one hand extremely dangerous. Why?  Often the opponent doesn’t even feel threatened. The opponent is more inclined to be focused on fighting off the other hand to keep his opponent from getting his second grip. The one-handed grip allows numerous possibilities for sudden attacks. This method also frustrates your opponent and generally, they will open themselves up for you to attack.

Get the first grip

A judo throw requires the establishment of a strong grip. An offensive gripping strategy can help keep the opponent or adversary on their heels both literally and figuratively. Not having a solid plan for your grips can leave you vulnerable and at the mercy of your opponent.

Arm pit grip (waki)

Outside of Japan the arm pit grip is a pretty rare gripping method. Some of the great Japanese judo players have used this grip successfully in their offensive arsenal. Gripping the folds of the cloth at the area of arm pit is extremely versatile. It provides incredible defense and distance control.

1.) Insert your fingers in the fold of the gi just above the opponent’s arm pit with your left hand. 2.) Grip the gi with primarily the bottom three fingers of your left hand and turn the hand over clockwise palm down. 3.) For gripping over top, it is same as steps 1 and step

The arm pit grip is very useful in blocking an opponent’s attacks, restricting his movements and keeping him at a safe distance. It is extremely effective in a right vs right situation or an opposite stance, right vs. left situation (Kenka Yotsu). It helps control his arm making it harder for him to put his hand down to block a throw, it also keeps him from reaching over the top of your shoulder. In the one-handed judo style you have the added benefit of the opponent not feeling threatened by only a single grip. Unlike a pull on the sleeve or the lapel pulling at the armpit is a much shorter pull.

Posture and punching in your grip

1.) Stand with the right foot forward. The knees should be bent and center of gravity low. Feet are shoulder width apart. Twist your upper body clockwise bringing your left hand and shoulder to the front closer to your opponent. You left hand is your attacking hand and should be positioned closer to your opponent. The right hand acts as the defensive hand. 2.) Much like delivering a cross in boxing, punch in with your left hand and grip your opponent’s gi right above the armpit. Your right hand is up and defending any attempts by the opponent to get his grip.

Fighting with your grip

When you have gotten your grip keep your wrist, elbow and shoulder loose and constantly hunt for the opportunity to throw your opponent. A common error after you have punched in your grip is to constantly hold the opponent away with a stiff nonmoving arm.

Get in the habit of fanning your elbow up and down. Keeping the left arm loose will enable you to block your opponent’s grip attempts, as well as push, pull to position him and keep him off balance and even counter his attacks. Neither your gripping hand nor the arm should be stationary. Keeping the arm active pushing, pulling and fanning it up and down also makes it more difficult for your opponent to grip and control your arm.

Blocking opponent’s hand before he gets a grip

This blocking method is similar to throwing a cork screw punch in boxing. As I rotate my gripping hand clockwise turning my thumb downward, I push the knuckles of my hand into my opponent.

1.) You have established an armpit grip with the left hand. 2.) As your opponent reaches over the top with his right hand, turn your left hand over clockwise turning your thumb to the floor and roll your elbow upward to block his hand before he is able to get his grip. 3.) As an option knock his hand away by striking his forearm with the heel of your right hand.

Blocking the opponent’s over the top grip attempt

1.) From a fighting posture, 2.) punch in your grip. 3.) The opponent immediately tries to reach over the top of your arm to grip your lapel. 4.) Drop your center of gravity and roll your elbow upward to block his arm before he gets his grip on the lapel. 

Blocking opponent’s grip attempt under arm

1.) From your fighting stance, 2.) punch in your grip. 3.) The opponent immediately tries to reach under your arm to grip your lapel. 4.) Drop your center of gravity by bending your knees. Simultaneously, twist your torso to the right and roll your elbow downward to block before he gets his grip.

 Breaking your opponent’s lapel grip

When breaking grips you have to be careful not to put yourself in a bad or compromising position to get thrown. In this scenario you have secured your grip first and the opponent manages to reach over the top of the left arm and grip the lapel with his right hand. Punch the left arm straight out and at the same time knock his grip loose with your right hand.

1.) You have gotten the first grip at the armpit grip with your left hand. 2.) The opponent reaches over the top of your left arm with his right hand and grips your lapel. Immediately straighten your left arm. 3.) Simultaneously break his grip by hitting his forearm with the heel of your right hand.

Keep in mind that breaking grips and even off balancing your opponent work hand in hand with the movement of your feet. The arms, hands the legs and feet are used in conjunction to move your opponent around off balance break his grip and set him up for your throw.

When opponent grips lapel over the arm

You can also use your opponent’s lapel grip against him using his grip on your lapel as a set up for a throw.

1.) From your fighting stance, punch in your grip first. 2.) The opponent immediately counters by reaching over your arm and gets his grip on your lapel. Push slightly against his armpit by turning your gripping hand clockwise palm down. 3.) Drop your center of gravity slightly by bending your knees. Simultaneously pull with the left hand. This will bring his head forward and off-balance him. 4.) Immediately pull upward and back bringing your elbow high during the pull. Simultaneously, step in with your right foot to get into position to enter for your throw.

 When opponent grips lapel under the arm

1.) From your fighting stance, punch in your grip. 2.) The opponent immediately counters by reaching under your arm and gets his grip on your lapel. 3.) Drop your center of gravity by bending your knees. Simultaneously twist your torso to the right and roll your elbow downward pressing downward on the top of the opponent’s forearm with your forearm. This will bring his head forward and off-balance him. 4.) Immediately pull upward and back bringing your elbow high during the pull. Simultaneously, step in with your right foot to get into position to enter for your throw.

When opponent grips right sleeve

1.) Punch your grip in. 2.) The opponent gets a grip with his left hand on your right sleeve. 3.)  Make a fist with your right and and bring it to your chest and roll the right elbow over the top of the opponent’s left arm. Simultaneously take a half step toward your opponent’s right foot with your right foot. 4.) Bring your elbow downward to the inside of his left arm. Simultaneously step again with your right foot to the opponent’s right foot.

Keep the gripping hand and arm active. The most effective movements are performed in an explosive manner. The simultaneous and explosive movement of the different parts of the body in a coordinated way allows for greater speed and force.

Ippon Seoi Nage from Armpit Grip (Back Step Entry)

1.) White stands in a right foot forward position. His right foot is at the bottom corner of the triangle and his left foot is back deep behind the other corner of  the triangle. Blue is in a right foot forward position. 2.) Blue punches in his grip with the left hand gripping at the area of the opponent’s armpit. 3.) The opponent attempts to reach over the top of your left arm with his right hand to get a grip on your lapel. 

4.) Blues rolls his elbow upward and blocks white's lapel grip attempt. As Blue blocks with the elbow he bend the knees to drop his hips lower (this creates a space for you to move into to execute a throw). 5.)  Blue pulls white toward his front with the left hand keeping the elbow high as his right foot steps slightly down the side of the triangle toward White's right foot. 6.) Blue's left foot steps behind his right foot through the triangle to the baseline of the triangle (back step). As Blue back steps his knees are bent. Blues belt line should be lower than white's belt line.

4.) Blue brings his right hand up under the opponent’s right armpit as his right foot steps back all the way through the triangle between the opponent’s feet. The toes of both Blue's feet should be pointing in the direction of the apex of the triangle.  Blue pinches the opponent’s right arm at his arm pit between his right forearm and bicep.  Blue rotate the palm of his right hand toward his head (this creates a tighter clamp on the opponent’s arm).  5.)  Blues legs straighten quickly and he pops his hips upward into the opponent. 6.) Blue continues to pull and twists his torso to the left, taking his right elbow toward his left knee to finish the throw.

Monday, April 17, 2023

Fighting Judo: Ippon Seoi Nage (Arm Pit Grip Variation)


Gripping, fighting and getting your grip is a means to an end...the end being executing a successful throw. The first point of contact for a judoka is getting their grip or grips on the opponent. It is of the utmost importance to get a dominant grip. Your grip should control the opponent. Both judoka fight for the dominant grip so It's also just as important to know how to neutralize your opponent’s grips and counter them.

It will be difficult to cover every gripping situation and many different ways to grip in a single article. I will just start with one and cover others in later articles. I liken a judoka getting their grips in a manner much like that of a boxer throwing a 1-2 combination. One hand punches in and is immediately followed by the other.

One handed judo style

The one-handed style of judo is very effective and allows for great adaptability and the ability to execute throws like Ippon Seoi Nage from multiple angles and directions. With this grip one is able to throw with either foot forward and to the right and left side. It leaves your opponent questioning from which direction you will attack.

In this style you get a grip with one hand while your free hand fights off the opponent’s attempts to get their grip. Most judoka look to get their grips with two hands this makes the seemingly minimal contact of just getting a grip with only one hand extremely dangerous, often the opponent doesn’t even feel threatened. The one-handed grip allows numerous possibilities for sudden attacks. This method also frustrates your opponent and generally, they will open themselves up for you to attack.

Get the first grip

A judo throw requires the establishment of a strong grip. An offensive gripping strategy can help keep the opponent or adversary on their heels both literally and figuratively. Not having a solid plan for your grips can leave you vulnerable and at the mercy of your opponent.

Arm pit grip (waki)

Outside of Japan the arm pit grip is a pretty rare gripping method. Some of the great Japanese judo players have used this grip successfully in their offensive arsenal. Gripping the folds of the cloth at the area of arm pit is extremely versatile. It provides incredible defense and distance control.

The arm pit grip is very useful in blocking an opponent’s attacks, restricting his movements and keeping him at a safe distance. It is extremely effective in a right vs right situation or an opposite stance, right vs. left situation (Kenka Yotsu). It helps control his arm making it harder for him to put his hand down to block a throw, it also keeps him from reaching over the top of your shoulder. In the one-handed judo style you have the added benefit of the opponent not feeling threatened by only a single grip. Unlike a pull on the sleeve or the lapel pulling at the armpit is a much shorter pull.

Right vs Right – Punching in your grip

A right vs right situation refers to both players being right-handed meaning the majority of their throws will be to the right side. In a right vs. right situation (pictured) your right shoulder should be more toward your rear. The right hand is held further back and away from your opponent and not out front and easily accessible for your opponent to grip and attack.  Your left hand or the gripping hand is active and offensive. Your right hand or rear hand is ready and active as well to defend against your opponent’s gripping attacks and can be used for feints to set up your throw.

1.) Stand with the right foot forward. The knees should be bent and center of gravity low. Feet are shoulder width apart. Twist your upper body clockwise bringing your left hand and shoulder to the front closer to your opponent. You left hand is your attacking hand and should be positioned closer to your opponent. The right hand acts as the defensive hand.

2.) Much like delivering a cross in boxing, punch in with your left hand and grip your opponent’s gi right above the armpit. Your right hand is up and defending any attempts by the opponent to get his grip.

Fighting with your grip

When you have gotten your grip keep your wrist, elbow and shoulder loose and constantly hunt for the opportunity to throw your opponent. A common error after you have punched in your grip is to constantly hold the opponent away with a stiff nonmoving arm.

Blue punches in his grip, white immediately tries to grip over the top of blues arm. Blue rolls his elbow up to block white's grip attack and simultaneously drops his lower by bending his knees. 

Get in the habit of fanning your elbow up and down. Keeping the left arm loose will enable you to block your opponent’s grip attempts, as well as push, pull to position him and keep him off balance and even counter his attacks. Neither your gripping hand nor the arm should be stationary. Keeping the arm active pushing, pulling and fanning it up and down also makes it more difficult for your opponent to grip and control your arm.

 Ippon Seoi Nage from Armpit Grip (Back Step Entry)

A triangle and a straight line have been taped on the mat to give a clearer reference of foot placement for executing the throw. 

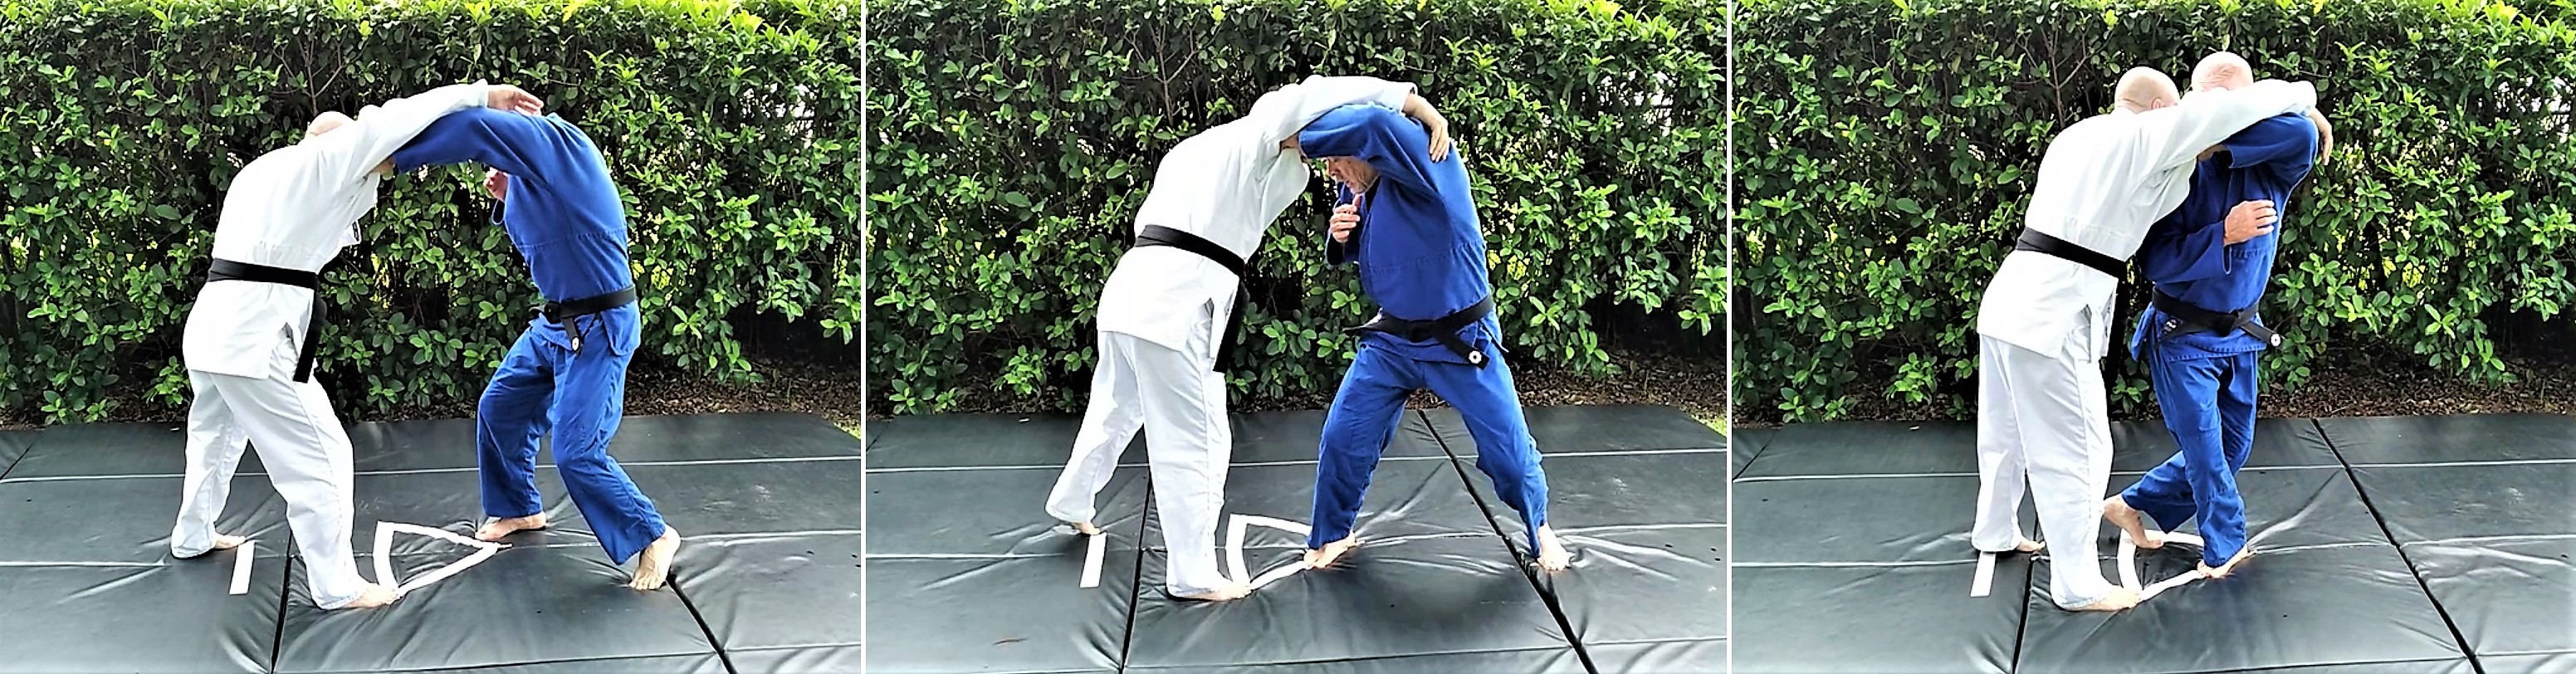
1.) White stands in a right foot forward position. His right foot is at the bottom corner of the triangle and his left foot is back deep behind the other corner of  the triangle. Blue is in a right foot forward position. 2.) Blue punches in his grip with the left hand gripping at the area of the opponent’s armpit. 3.) The opponent attempts to reach over the top of your left arm with his right hand to get a grip on your lapel. 
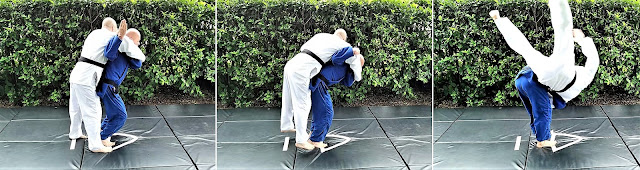
4.) Blues rolls his elbow upward and blocks white's lapel grip attempt. As Blue blocks with the elbow he bend the knees to drop his hips lower (this creates a space for you to move into to execute a throw). 5.)  Blue pulls white toward his front with the left hand keeping the elbow high as his right foot steps slightly down the side of the triangle toward White's right foot. 6.) Blue's left foot steps behind his right foot through the triangle to the baseline of the triangle (back step). As Blue back steps his knees are bent. Blues belt line should be lower than white's belt line.

4.) Blue brings his right hand up under the opponent’s right armpit as his right foot steps back all the way through the triangle between the opponent’s feet. The toes of both Blue's feet should be pointing in the direction of the apex of the triangle.  Blue pinches the opponent’s right arm at his arm pit between his right forearm and bicep.  Blue rotate the palm of his right hand toward his head (this creates a tighter clamp on the opponent’s arm).  5.)  Blues legs straighten quickly and he pops his hips upward into the opponent. 6.) Blue continues to pull and twists his torso to the left, taking his right elbow toward his left knee to finish the throw.

Thursday, March 30, 2023

A COMBAT JUDO TESTIMONIAL

Being able to utilize judo and its principles in a street encounter requires more attention to the technical aspects of throwing an aggressor not wearing a judo gi (uniform). I have in the past two years written three books addressing this very thing, two of which got great reviews and have sold out. My third book (pictured left) "Combat Judo" will be published 2024. 

With that being said, it is not often I get stories from people who had to defend themselves from some overly aggressive individual hell bent on doing someone bodily harm using my particular method of judo. However, I recently received the following from one of the guys, Marty, who purchased both of my books on Combat Judo and practices my Combat Judo methods and system. He wanted to share this particular incident and I thought I would share his story/testimonial:

"Well, some shit hit the fan last night. Apparently, my wife’s ex-boyfriend got a little aggressive with her last night when he was dropping off my stepdaughter. My truck was parked around back because I doing an oil change on it. He thought I was gone. I walked up on them asking this guy, whose name is Jim, “why don’t you push me around?” Jim stands 6’1” about 300 pounds, big guy. Now mind you Jim is supposed to be this serious boxer and he told my wife that if I ever got lippy with him he’d have to show me. He starts to come towards me. Well the first thing I did was jab, pushed him back, grabbed him and did the Cross hock takedown. Needless to say his he bounced off the ground and he’s just lying there. I thought I killed him. Turns out the impact from the throw knocked him out. The police were called. The officer asked what happened. I gave him all the details about Jim attacking my wife and I. The officer said I guess he got a free lesson in judo. I just wanted to let you know that I love your stuff, its great stuff AND IT WORKS!!!!" - MM 

Personally as a long time Judoka, I look at what I do with the sole perspective of; If this is the system I am fighting with, how am I going to do that and be effective in a realistic context? In my first book, REAL COMBAT JUDO, I worked off a very specific tactic called “THE STOP”. This tactic can be found in the US Army combatives Field Manuals 21-150 from 1954 through to 1971. It can also be found in earlier works such as Willaim Jacomb’s 1918 book on Practical self defense where it is referred to as “THE STOP”. It is also used in the 1905 book, The Complete Kano Jiujitsu/Judo.  Simple, gross motor driven direct and effective, it takes our natural survival instincts into consideration and allows those survival instincts to work as a foundation for a very rapidly delivered technique.


 “The Stop” capitalizes on the natural human reaction to extend your arms when someone attacks you by pushing him away.  Turning this instinctive reaction into a hit, thrown much like a straight punch in boxing as opposed to a push, you can stop the rotation of the attacker’s torso at his shoulder. “THE STOP” can be utilized as a preemptive strike or when the attack is recognized early or late. Preemptively, “THE STOP” is used just before the adversary is within striking distance and when your intention is to take him to the ground. When delivered it stops the forward motion of the attacker and brings his arms up toward the front (1st picture below).

When it is used to intercept a punch early, striking the pocket of the shoulder stops the rotation of the adversary’s torso at his shoulder (2nd picture above). “THE STOP” is also effective when you pick up on the attacker throwing a punch late. For example, if the attacker throws a right haymaker, step off line of the punch and at an angle to your right and deliver the strike with your left hand to the attacker’s right shoulder (3rd picture above). This tactic basically short-circuits the power of your attacker’s punch at the root of its motion.

Cross hock takedown (Osoto Gari) vs Punch 

1.) The attacker throws a right haymaker, push off your left foot and step off line of the punch toward 1 or 2 o'clock with your right foot. Deliver "the stop" with your left hand, as if throwing a rear hand straight punch in boxing, to the attacker’s right shoulder area just above the arm pit (1st picture above). Immediately grab the attackers shirt at the area struck. 

2.) The defender pulls the attacker into him with his left hand by the shirt as he pushes off the right foot and steps toward 1130 with the left foot. The defender drives his right shoulder into the attacker. He then strikes with a right elbow hook raking hard across the attacker’s ribs. 

3.) He swings his right leg up between the attacker's right leg and his own left leg. He then reaps the attackers right leg up high to execute the takedown.

Important Note: “THE STOP” is your initial entry into a throw, it is not a push!!! It is meant to disrupt an opponent's balance and posture. It is a hard strike, delivered much like a straight punch in boxing while driving forward off the rear leg. It targets the shoulder and is immediately followed by grabbing the adversary’s shirt at the area struck. The stop can be used to set up any throw in the Combat Judo arsenal.

Tuesday, August 2, 2022

KAJUKENBO: The First of it's Kind


“Kajukenbo is the first of its kind of all origins in mixed martial arts.  Prior to its known existence in 1947, the history of Kajukenbo began when the USA was in war with Japan.  Before it became worldly known as Kajukenbo in the 1960’s, we called it Kenpo Karate.”  – MSgt. Tony Lasit, U.S. Air Force, Ret., Veteran of WWII, Korea, Vietnam and Founder of the U.S. Kajukenbo Association.

Much like the U.S. Armed Forces military servicemen that trained in Combat Judo during WWI and WWII, Kajukenbo was designed to disarm, disable and destroy an opponent with fierce proficiency. From its beginnings, Kajukenbo was an eclectic and adaptive self-defense oriented fighting method. Its sole purpose…..SELF DEFENSE. 

                          CLICK HERE FOR FULL ARTICLE @COMBATJUDO.NET


Monday, October 4, 2021

WW2 RESTRICTED JUDO: The US Army’s Amphibious Training Center’s Judo Fighting method


This article is about honoring a hero…..a fallen hero…..a ‘Commando’ instructor at the Amphibious Training Center (ATC) who created the 4th Division Ranger program and the online pdf file commonly refered to as the WW2 Restricted Judo syllabus. Having been retyped on a computer the “WW2 Restricted judo” syllabus pdf has been available on the internet for years, found in websites like scribd.com and in the files sections various WWII era combatives related Facebook groups.


When it comes to the subject of Combat judo, one of the most interesting documents that is out there and readily available in pdf form on the old inter-web is the “WW2 Restricted Judo syllabus”. Not much is mentioned within the online pdf document itself about where it actually came from or who put it together or what units used it. You honestly couldn’t escape the title “RESTRICTED JUDO” and the motto “Kill or be Killed” CLICK HERE TO CONTINUE READING


Tuesday, May 18, 2021

NEW BOOK: REAL COMBAT JUDO by Barron Shepherd

Combat Judo was originally developed to address the needs of military personnel facing new hand-to-hand combat challenges as a way to ensure a streamlined, tested, and effective method of fighting. This approach combined the most suitable high-yield, low-risk judo techniques, ensuring the best physical training for working functional techniques against violent encounters. Combat Judo’s curriculum was designed to enable one to learn much faster and build muscle memory much quicker than the kind of learning in a standard classroom setting. Students learn the ability to react with the economy of energy and motion.

REAL COMBAT JUDO is a training manual that is structured in a very progressive manner enabling one to progress from beginner level throws and takedowns to more advanced applications making the techniques more effective. The lessons are meant to be followed in the order in which they are written. The principles of the mechanics of the throws are repeated heavily to aide in instilling them in the mind of the reader for quicker development of technique. The drills and training are designed so that what the students do in practice is how they can quickly respond and do in combat. For the experienced Judoka, Combat judo is designed to help bridge the gap between sport judo and combat based judo to ensure that it can be utilized effectively for today’s violent encounters.

Combat Judo’s streamlined method of combat also incorporates techniques with the knife and the tactical baton. The Knife and Baton techniques are laced with the Combat Judo’s empty hand techniques which allows for a quick and effective method of use of both knife and Tactical Baton.

ORDER HERE


Wednesday, March 3, 2021

THE CROSS HOCK TAKEDOWN: OSOTO GARI VS THE BLADE

There probably isn’t a scarier scenario than being unarmed and facing someone with a knife. Whether civilian or law enforcement or military, I think it is safe to say that if you find yourself in this situation something… CLICK HERE TO CONTINUE READING

Friday, February 12, 2021

DERMOT PAT O’NEILL’S WWII EXTREME CLOSE QUARTER FIGHTING METHOD


DERMOT PAT O'NEILL TRAINING THE FSSF FIGHTING FROM THE CROSS ARM GUARD

The cross-arm guard, referred to in combatives circles as he O’Neill Cover is often credited to Pat O’Neill. Dermot Pat O’Neill was the legendary hand to hand combat instructor for the FSSF First Special Service Force the precursor special forces group to the Green berets and army special forces. O’Neill’s methods differed from his mentor Fairbairn as in that O’Neill was tasked to train commandoes to fight in close quarter combat behind enemy lines. On this type of mission taking on multiple combatants from all angles and directions was a distinct possibility. What O’Neill came up with turned out to be an extremely effective fighting method for extreme close quarter fighting......CLICK HERE TO CONTINUE READING


Thursday, January 7, 2021

DERMOT PAT O'NEILL'S KNIFE METHOD


The purpose of the study of O’Neill’s only knife technique is to provide a specific knowledge regarding the use of the knife in Hand-To-Hand combat; to describe positions and movements used in attack and defense/counter offense, and to set forth a program for instruction in the O’Neill system of Hand to Hand combat...…..CLICK TO CONTINUE READING

Sunday, June 21, 2020

COMBAT JUDO: KANI BASAMI

Sensei T. Tucker demonstrating Kani Basami on me (Winter Haven News Chief 1997)

In my last article I talked about SSG Robert Carlin’s inclusion of the drop kick in his classic WWII Combatives manual Combat Judo and how his drop kick more than likely come from a technique called Kani Basami, the scissor takedown or crab scissor. Both techniques are executed in much the same way. 

For me personally, Kani Basami was one of the throws that really caught my imagination in my study and practice of judo. It wasn’t a technique that is shown to beginners, that was for sure and I recall not being taught Kani Basami until after I was at a more advanced level. I learned kani basami as a leaping technique as opposed to the posting a hand on the mat version. I remember thinking when I saw the execution of the throw that it was indeed very advanced as well as very athletic. It remains the one throw that my instructor taught that stands out the most in my mind. Often when we would randori my teacher would surprise me with this technique. 

Tactically, Kani Basami had many advantages. Mainly it was/is a high percentage takedown with a very low risk of getting countered. It can also be used as a counter. It is one of the best dynamic entries one can use to surprise their opponent. 

With Kani Basami my instructor was particularly careful when executing it. A point of fact, he was extremely careful in our practice of it. It is a technique that has caused a number of injuries over the years in competition and practice and as a result it has been banned from competition. Even when Kani Basami is EXECUTED by a well-trained Judoka, the slightest misjudgment of distance and height on a moving opponent can result in a serious and even career ending injury. The injuries most often occur when the technique is executed too low and the thrower’s shoots his far side leg in first. With the leg furthest from your opponent going in first the thrower’s body weight is driven into the side of uke’s leg (much like a baseball player sliding into home base).  This has the potential to cause serious injury to knee (the ACL can blow easily) and ankle. 

To execute the throw safely and effectively the thrower has to place one leg across the opponent’s abdomen right at or just above the waist and the other leg is placed much lower down behind the knee or shin. To avoid injuring your opponent, the thrower should leap upward and throw the leg that is going to the front of the opponent’s abdomen/waist first, slightly ahead of the thrower’s other leg, that goes behind the opponent’s knee. 

RIGHT SIDE EXECUTION OF KANI BASAMI

Generally, this throw is executed when you are to the opponent’s left side and both of your feet are in line with both of his feet.  While gripping on the opponent’s shoulder, around the neck or the lapel with the right hand, the thrower launches off both feet and jumps up with his body facing to the left placing his right leg on uke‘s lower abdomen at the waist or just above. The thrower’s left leg then goes to the back of uke's knees. The thrower executes a scissor-like movement, from both the front and the rear, on the lower half of uke's body. The thrower twists his waist back towards the right, pulls back with the right hand while reaping so that uke falls towards his rear.

Now some may be used to seeing a lot of vids on you tube with the throw being executed by posting a hand on the mat and then executing the take down. However, as mentioned before, I was taught it as more of a leaping/jumping technique. Another point one may need to keep in mind is that I wouldn't leap directly into uke but rather the leap was directed more toward the rear as to further off balance uke rocking him back on his heels.